
Hi Guys, I hope you have read my previous post where we have seen the Order Entry and Wave planning process for orders in D365 FO. In this blog, we’re going to pick up where we left from our previous blog and see how the Picking process is done in D365 FO. We will perform Cluster Picking of those orders.
So here we are back on our map, and the next step or the next place we need to visit is going to be picking.

Now that we have the orders in a wave and they’ve been dropped to the floor, processed as we like to call it in D365 FO, it’s time to actually pick the work. We’re going to see how picking really is a two-step process. We have to build the clusters first and then we can pick them afterward.

Let us see how D365 FO can be used to cluster pick or multi-order pick these four orders that we just waved and dropped onto the floor. Before we do that we need to see the work that’s outstanding for those. As you can see here, we have four different work IDs. Each one of these corresponds to one of the orders. And let me use this point to suggest that if you have a retailer who would like to preprint the packing slips and actually include them in the tote that’s going to be used to accumulate the merchandise for a particular order, now would be the time to print those out, but what I suggest that you do is not necessarily create some functionality that allows you to pick or print the actual packing slip, but instead, D365 FO has is a concept known as the work report. And the work report gets generated for each individual work ID.
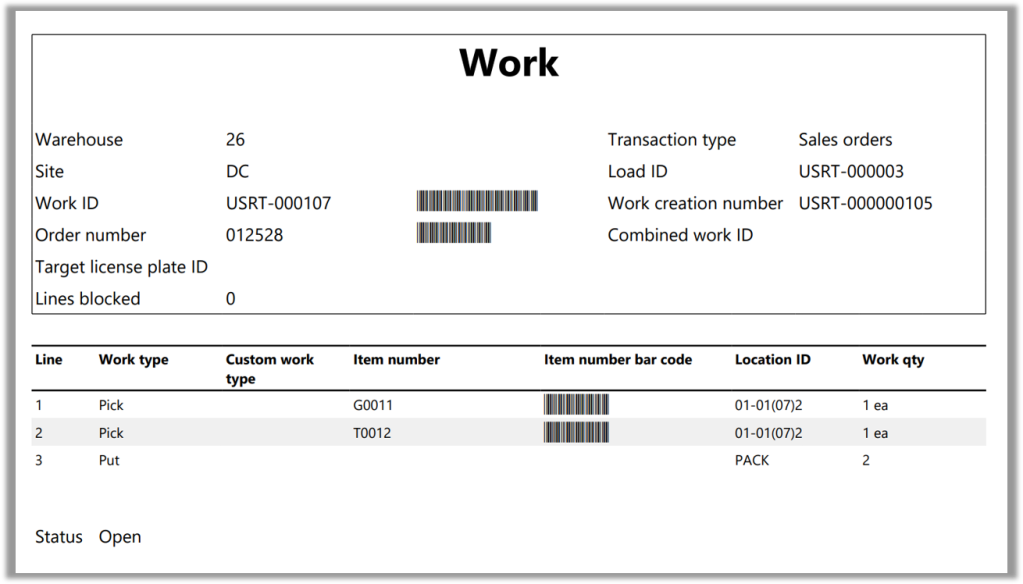

So it will work here with work ID number USRT-000107, which is for this particular order, The work ID report looks something like this, but you can take this report and modify it to look more like a packing slip, and you can print these off at this point in the process as opposed to printing the packing slips is very difficult. That would require a lot of enhancements. You can modify this form to look just like a packing slip and comply with that requirement for those retailers that might need a packing slip at the start of the packing process. Regardless, the D365 FO process for cluster picking requires that you print off these or have these work ID numbers available anyway to cluster the orders together. So imagine that for each of these four orders we have printed out that work ID slip, and we have them in front of us. So we need to build a cluster. That’s the first step associated with the cluster picking process. So we would have this big stack of papers in front of us, and some fellow will be scanning those into, say, groups of 12 or in this case we’re going to say a group of four. So they’ll all, all four orders will be picked simultaneously.
So let’s start doing that. We’ll go over to our Warehouse mobile device, and we’ll go into the Outbound menu and we’ll choose Create clusters for picking that’s specially designed for creating picking clusters.

So we go in there, and say, what is in our first tote, what work ID are we going to put in there? So we’re going to put in the work ID USRT-000107 into position one. Now it’s saying what order is it going to be in position two? Well, it’s going to be USRT-000108, and it’s going to ask me for position three and here it goes USRT-000109. And then for the fourth position its going to be USRT-000110. So now we have our four orders in the cart. If your cart usually have 12, you might want to click Done, if you pick only four as in this case.

Once you press Done, it tries to start picking those, but in reality, the process of creating a cluster is going to be separate from actually doing the picking. So you can imagine once we’ve created that cluster of those four orders, we would take those work-order reports, We would probably wrap them with a rubber band and would write the cluster number on the front. So when it started to actually perform the picking, we’d say, no, we are just going to pass. We are not going to do that picking. We are going to leave that for someone else. So let’s see what cluster this has just created. Navigate to Warehouse management > Work > Outbound > Work cluster and there’s my cluster-ID USRT-000000002. We are going to need that to start the actual picking process.

So we have the cluster ID in hand and now we are the picker. So we’ve gone over and got this stack of paper of four work order IDs, and we just distribute those into the totes that we are going to pick. Take you Warehouse mobile device and go to Outbound and then Cluster Pick.

It asks us for the cluster-ID. We enter that in off of the sheet that the cluster builder left us. And now it’s ready to start picking. So it tells us to go to this particular location and pick a quantity of 3 of those Soundbars and scan or enter the License plate because the location that this item resides is license plate enabled. So we go there and pick it. Now it says to put one of those Soundbars, one unit, into position one. So just to verify that we are putting it into the correct position or tote, it asks us to scan the position. We probably would have bar codes on the carts with the numbers 1, 2, 3, and 4 underneath each of the respective totes. So we will scan the barcode under tote one. Then it says, to put one more of those in position three. So we scan the barcode under tote three. It says you know what? Position four also needs one of those units. So we scan the barcode under position four.
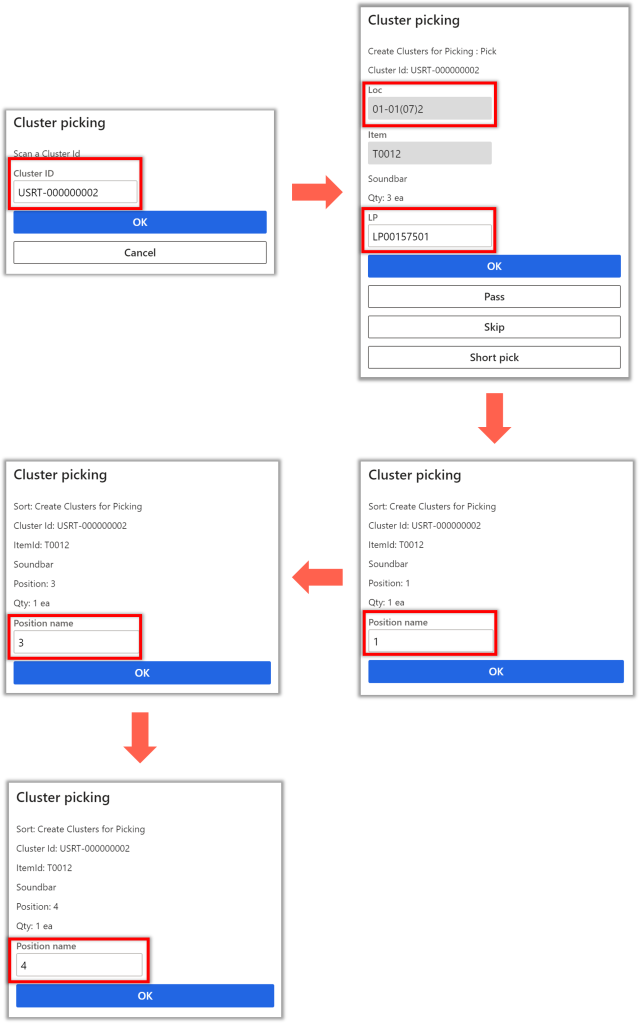
So now it sends us to our second pick, to pick up those Mesh BMX Gloves, and guess what? we’ve got to pick four of those. We grabbed four out of the pick location. Now it tells us where to put them. We need to put one in position one and we’ve got to put two in position two. And now we’ve got to put one in position four, and you can see if we try to do something funky like put it into position five by accident it’ll tell us, hey, you can’t do that. It’s going in the wrong place. So we put that into position four. And we’ve done all our picking for all four orders.

And now it’s directing us to take that cart with those four totes on it to the packing station. So just to verify that we’ve actually done that, it’s asking us to scan the pack location and we will haul that cart over there and now we are done with picking.

So that’s essentially the cluster-picking process. So I hope you got a better understanding of the Retail Outbound picking, especially Cluster Picking operation in D365 so it is easier for you when you go and implement the D365 FO Warehouse management module for the Retail Outbound processes.
In the next blog, we’re going to see Replenishment in D365 FO and also how through the wave-planning process it’ll bring the product up, and we’ll see how D365 FO will slot that into a dynamic location where we can pick it afterward.
Feel free to reach out for any clarifications. If you like my blog posts then comment and subscribe to the blogs.
#RetailDAXing #D365Commerce
